Calcium Builds/Tier 3 Desert Boss WIP: Difference between revisions
Appearance
CanuckMonkey (talk | contribs) No edit summary |
CanuckMonkey (talk | contribs) m Minor wording, and title change as this is now complete |
||
| (One intermediate revision by the same user not shown) | |||
| Line 1: | Line 1: | ||
{{Build | {{Build | ||
|BuildName=Tier 3 Desert Boss | |BuildName=Tier 3 Desert Boss | ||
|PlayerCharacter=Calcium | |PlayerCharacter=Calcium | ||
|Author=CanuckMonkey | |Author=CanuckMonkey | ||
| Line 11: | Line 11: | ||
|Tome2=Regen Tome | |Tome2=Regen Tome | ||
|Tome3=Quantity Tome | |Tome3=Quantity Tome | ||
|Tome4= | |Tome4=XP Tome | ||
|Item1=Medkit | |Item1=Medkit | ||
|Item2=Turbo Socks | |Item2=Turbo Socks | ||
| Line 18: | Line 18: | ||
|Item5=Sucky Magnet | |Item5=Sucky Magnet | ||
|Item6=Holy Book | |Item6=Holy Book | ||
|Strategy=This build is designed to allow you to reach and then survive during the pylon phase of the Juge Anubis fight. Because it uses two defensive tomes, you need to get your luck | |Strategy=This build is designed to allow you to reach and then survive during the pylon phase of the Juge Anubis fight. Because it uses two defensive tomes, you need to get your luck and difficulty boosts elsewhere. The original version of this build had a Cooldown Tome but I replaced it with the XP tome as I found that to be more effective. I aim to get my +Difficulty from Greed Shrines and my +Luck from Charge Shrines and items. | ||
The Armor Tome ends up being the key to surviving this boss. I went into the final battle with somewhere around 80% armor, and that turned out to be enough to survive the intense barrage while I got the pylons down. | |||
I'm avoiding the Agility Tome in this build because it gets too hard to precisely control your positioning during the final battle with high movement speed, but you could use that instead of | Try to get at least one Shield bonus from a Charge Shrine, since a single hit can only damage either your shields or your HP. As long as your shields are up, you can survive one hit no matter how big it is. If you don't manage to get one, though, having high enough armor can compensate; it just makes the earlier parts of the run more challenging. Also be sure to get some jump count bonuses from your Charge Shrines, as they are immensely valuable in reaching the pylons quickly. | ||
I'm avoiding the Agility Tome in this build because it gets too hard to precisely control your positioning during the final battle with high movement speed, but you could use that instead of XP if your reflexes allow it and you are getting the armor levels high enough without the XP tome. | |||
}} | }} | ||
Latest revision as of 17:03, 11 February 2026
Tier 3 Desert Boss
1
Weapons
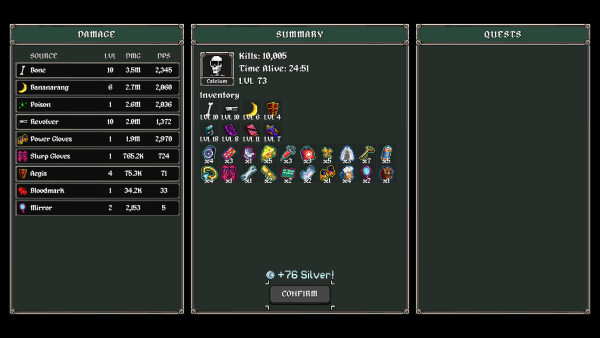
This build is designed to allow you to reach and then survive during the pylon phase of the Juge Anubis fight. Because it uses two defensive tomes, you need to get your luck and difficulty boosts elsewhere. The original version of this build had a Cooldown Tome but I replaced it with the XP tome as I found that to be more effective. I aim to get my +Difficulty from Greed Shrines and my +Luck from Charge Shrines and items.
The Armor Tome ends up being the key to surviving this boss. I went into the final battle with somewhere around 80% armor, and that turned out to be enough to survive the intense barrage while I got the pylons down.
Try to get at least one Shield bonus from a Charge Shrine, since a single hit can only damage either your shields or your HP. As long as your shields are up, you can survive one hit no matter how big it is. If you don't manage to get one, though, having high enough armor can compensate; it just makes the earlier parts of the run more challenging. Also be sure to get some jump count bonuses from your Charge Shrines, as they are immensely valuable in reaching the pylons quickly.
I'm avoiding the Agility Tome in this build because it gets too hard to precisely control your positioning during the final battle with high movement speed, but you could use that instead of XP if your reflexes allow it and you are getting the armor levels high enough without the XP tome.


